|
Lesson 3Aperture
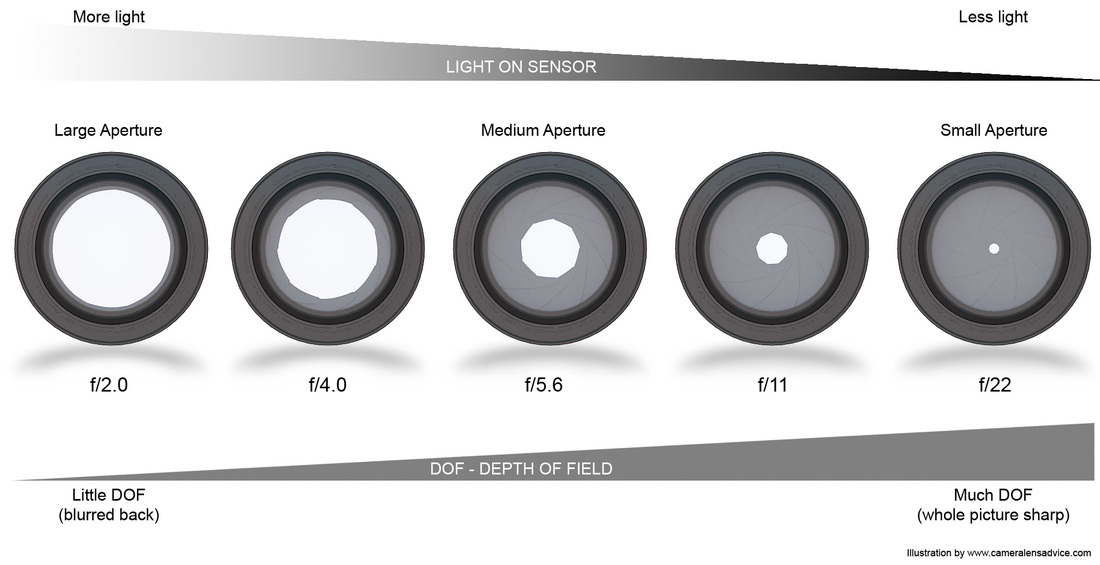
An aperture is simply a hole, space or opening. In the case of a camera its a hole that lets light through. How you change the aperture will change how your images look. If you have a large hole or Aperture just the thing you have focused on will be sharp. If you have a small hole or aperture then lots of the subject will be in focus. this is called your depth of focus or "Depth of Field." |
Camera Controls 3
Aperture
Now you have taken control of your camera what will you do with it. Have a look at some of the examples below where aperture plays an important part in the technique the photographer uses.


What is Aperture?
What is Aperture?
Simply put, aperture is a hole within a lens, through which light travels into the camera body. It is easier to understand the concept if you just think about our eyes. Every camera that we know of today is designed like human eyes. The cornea in our eyes is like the front element of a lens – it gathers all external light, then bends it and passes it to the iris. Depending on the amount of light, the iris can either expand or shrink, controlling the size of the pupil, which is a hole that lets the light pass further into the eye. The pupil is essentially what we refer to as aperture in photography. The amount of light that enters the retina (which works just like the camera sensor), is limited to the size of the pupil – the larger the pupil, the more light enters the retina. So an easy way to remember aperture, is by associating it with your pupil. Large pupil size equals large aperture, while small pupil size equals small aperture.
Simply put, aperture is a hole within a lens, through which light travels into the camera body. It is easier to understand the concept if you just think about our eyes. Every camera that we know of today is designed like human eyes. The cornea in our eyes is like the front element of a lens – it gathers all external light, then bends it and passes it to the iris. Depending on the amount of light, the iris can either expand or shrink, controlling the size of the pupil, which is a hole that lets the light pass further into the eye. The pupil is essentially what we refer to as aperture in photography. The amount of light that enters the retina (which works just like the camera sensor), is limited to the size of the pupil – the larger the pupil, the more light enters the retina. So an easy way to remember aperture, is by associating it with your pupil. Large pupil size equals large aperture, while small pupil size equals small aperture.
If you wondered how we get the actual numbers for apertures here's the mathematical equation.

Depth Of Field
What is Depth of Field?
Depth of field is the zone within a photo that appears sharp and in focus. In every picture, there is a point of focus (where you actually focus your lens). But there is also an area both in front of, and behind, your point of focus that also appears sharp – and that area corresponds to the depth of field.
So by adjusting your camera settings and your composition, you can determine the amount of your image that turns out sharp and the amount of your image that ends up blurry.
Now your camera can only focus sharply at one point. But the transition from sharp to unsharp is gradual, and the term in focus is a loose one! Without getting too technical, how you will be viewing the image, and at what size you will be looking at it are factors that contribute to how acceptably sharp an image is. It also depends on how good your vision is!
Scientifically, it is based on something called the circle of confusion. This involves more physics than I’m going to get into here! Spencer talks about it in his article “Hyperfocal Distance Explained.” So check that out for more of the technical details if you are so inclined.
In these two sketches, I have tried to illustrate what is meant by a narrow and large DoF. In a photograph with a narrow DoF, only a small slice of the image is in focus. Conversely, with a large DoF, much more of the scene is sharp.


|

|
|
In the first photo, we’ve set our focus on the closest LEGO figure and adjusted the aperture as wide as it will go on our lens (f/1.8):
The figure closest to the lens is sharp, but the focus falls off immediately after that (the second figure is only an inch behind the first). You’ll also notice that while the photo has a nice dream-like quality to it with all that soft focus, it’s also not razor sharp even in the acceptable depth of field range; that’s a tradeoff you make with most lenses. Shooting with the aperture as absolutely wide open as it will go is usually not the sharpest setting the lens can offer. |
Let’s adjust the aperture to f/22 and see what happens:
We lose a little light in the adjustment (remember the only thing we’re changing is the aperture setting for the sake of consistency), but now the first two figures are really sharp and the third figure is significantly more in focus than in the first image. Our depth of field has expanded from a fraction of an inch to a few inches. |
What happens when you change your aperture
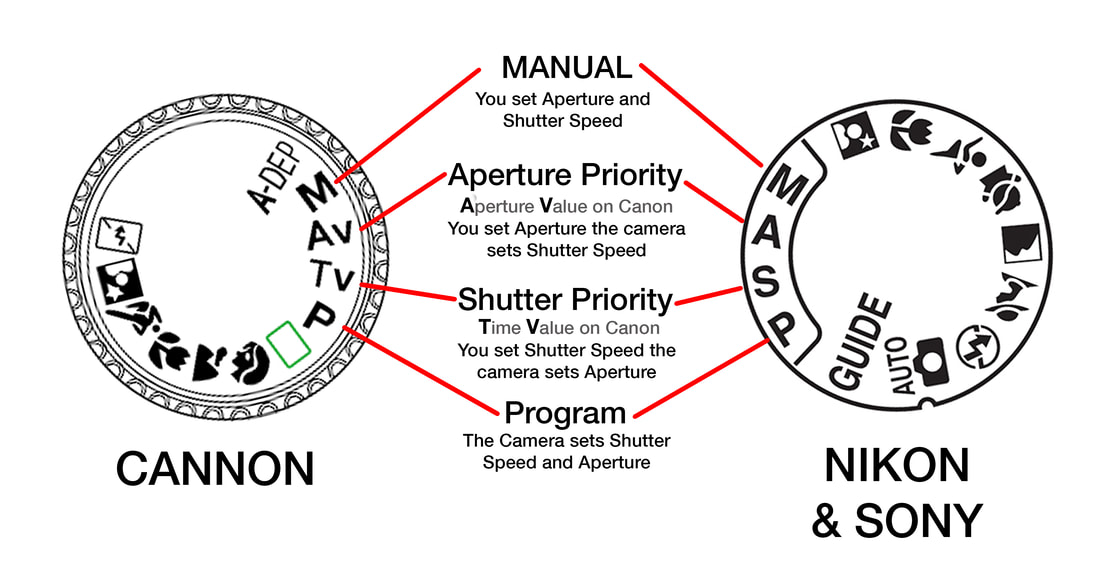
How to set up your camera
If you are having problems making this work make sure your camera is set up correctly. This may mean you have to get out your manual to find out how to change your settings but it will be worth it. Make sure your camera is set to focus on the centre spot and lock focus. On most cameras this is called One Shot
Share Your Best Images
Take time to share with the group a couple of you images from the "In and Out of Focus" project. Perhaps you are particularly pleased with some of your results, or perhaps something went specularly wrong and you don't know why. Either way it helps everyone if we share our High points and a low point so we can all learn together. Click on the link to the shared Google Photos folder and upload a few images to get the conversation started.